Since I have so many friends with toddlers, and it seems we are always looking for activities to keep them entertained, I thought I'd share some of our homemade toys and activities. Some ideas I took straight from Pinterest, some I just whipped together out of desperation and some were designed for one purpose: keep Megatron entertained during the 4 hour road trips to Pittsburgh to see his transplant team and during doctor appointments. For that reason, many of the activities are quiet and all are battery free (ie: Not made by the evil, yet genius LeapFrog). Also, with cold and flu season coming up and the gross weather just around the corner, I knew I needed to step up my game when it comes to keeping him occupied at home. These are all "sometimes toys." I don't leave these out (though #1 stayed out for months and is currently off our toy rotation and is in the basement. I'll probably bring it back out soon) all the time so the novelty doesn't wear off as quickly.
Feel free to steal the ideas or, if you aren't crafty, don't have the time or just don't feel like it, I can be hired to recreate these. Haha.
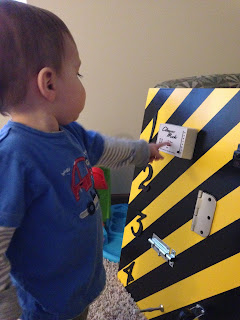
1. This first one was really the only expensive and time consuming project but I knew he would love it. I made this busy board at the beginning of the year so he was about 18 months old at the time. I would have loved to have had it done in the fall or early winter last year when he was just a little younger but we had 2 hospital admissions so yeah.... But once we got through that, we picked up nearly all of the supplies at our local Habitat for Humanity ReStore retail store. We bought the wood square (already cut) at Home Depot along with the spray paint. The painting took the most time since I had to do 2 coats of yellow, then mask it off and paint the black.
At the time, Megatron loved light switches and of all things, thermostats. So those items were a must. The numbers are actually house numbers and are bumpy so I knew he would like to scratch his fingers on them like babies do. The door stopper is also a hit because we don't have the springy door stoppers in our house. This one is very springy and makes that wonderful "boing!" sound (the plastic tip doesn't come off so it isn't a choking hazard).
These pictures were taken when I first showed it to him back in January....oh my gosh he was so tiny! He's not a baby anymore!
 |
| Errmagawd, my own thermostat?! |
 |
| So serious! |
 | | |
| Baby squats. |
|
|
|
|
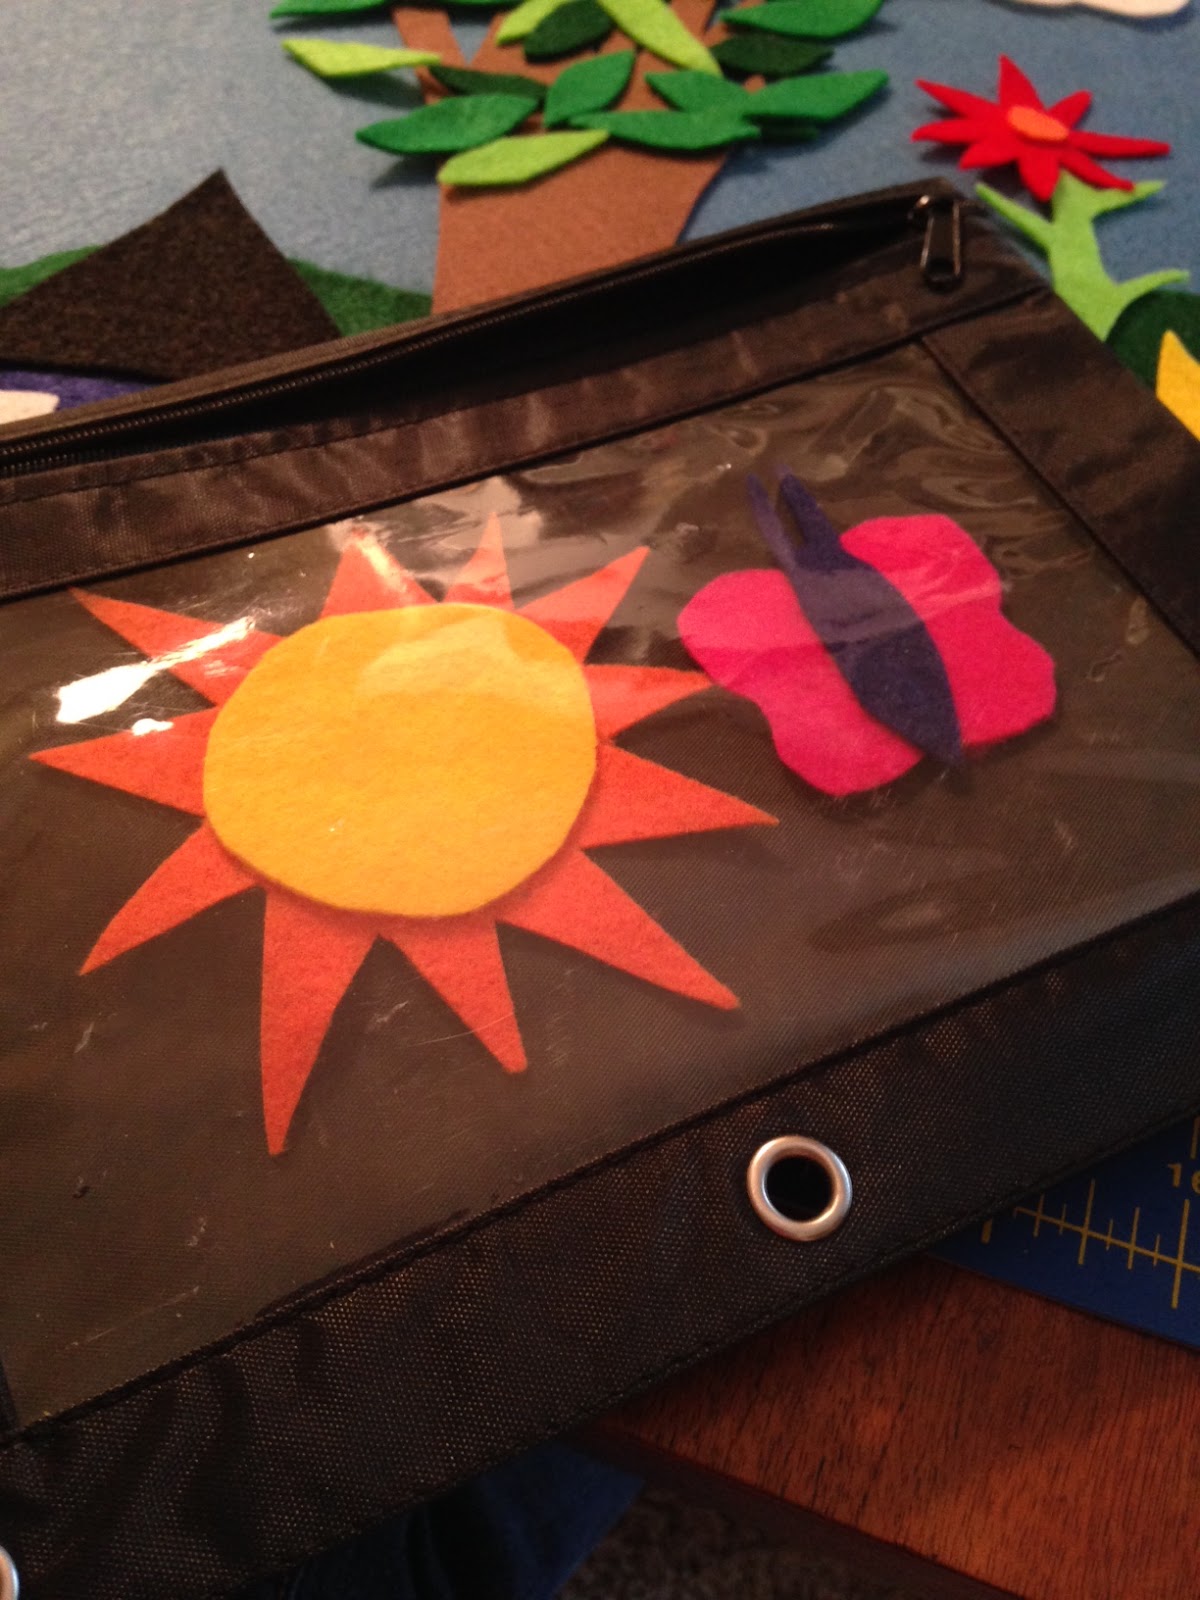
2. I made this felt board recently after getting the idea off a local moms group on Facebook. I took a square cork board (on clearance at Target!), then stapled a felt background to the board. I then cut out a bunch of random items out of felt. Trees with individual leaves, flowers with separate stems, a butterfly, clouds, sun, etc. All things he can use to "build" his own scene. I bought 8.5 x 11 sheets of felt at a local teacher supply store but Joann Fabric also carries it. Once I had everything cut out, I put the shapes in a zippered binder pouch (I found mine at both the dollar store and Walmart for under $1 each). I use these binder pouches for a lot of these activities because they hold up better than a Ziploc bag, and they stand up when I stick them in one of my 31 Gifts tote bags (perfect for filling with toys and taking to the car for a road trip!). It also keeps the activities separate and Megatron now knows how to open them without help.
 |
| I knocked this out during Megatron's afternoon nap recently. It was a win win because I got to use the crafty part of my brain and Megatron now has a rainy day activity. |
3. This too was a recent creation. Megatron has seen this one and I already know I have a design flaw. Haha. We have always used Target wipes. Recently, the lids keep pulling off the bags (making me crazy but that's another story) which is how I got the idea. Megatron loves to open and close the wipes packages so whenever we used a bag up or the lid fell off, I would toss the lid on my
hoarders' delight pile of craft crap craft table, thinking I would try to make something for him. During his nap time recently, I took a piece of foam board and glued the lids down to the board. Under each lid I placed something I already had
hoarded saved in my craft supplies. Googly eyes became a smile, a scrap of ribbon became a fuzzy texture to feel, the cat is a foam sticker, and the flowers are felt stickers with a brad in the middle - more textures! And because we are Disney people, Mickey Mouse is saying "Howdy!" I also made labels for under each lid with a label maker. It's never too early to introduce words even though the kid is still learning to speak. I also took some random stickers and numbered the lids and then put the corresponding number of squares below each lid. Megatron does know some numbers so we've been trying to give lots of opportunities to use them. My design flaw became obvious two days after I showed this to Megatron. He pulled one of the lids off the board already. I only used Tacky Glue so I think I'll use something like Gorilla Glue when I glue it back down. Hopefully that will hold better. But considering that I already owned all of these supplies and it was "free," I really wasn't expecting this to be a long-term toy.


 |
| Love those new-to-him Fall jammies! |
4. This Popsicle matching game idea came from Pinterest. I used felt and cut out the Popsicle shapes, then sewed them together, leaving the bottom open. I then took Popsicle sticks and glued a piece of the matching color felt on the stick. And even though he doesn't read, I went ahead and wrote the colors on the opposite side of the stick. For now, he just likes to take the sticks in and out of the zippered pouch and he knows the color blue so he will point to it when asked (if he wants to) but the goal would be to practice matching the right stick with the right Popsicle and putting the stick in the bottom. This took me about 15 minutes even with cutting and sewing.

5. Using the larger sized Popsicle sticks, I placed Velcro dots on the ends. He can stick them together to make shapes. He doesn't understand these yet but putting them in and out of the bag keeps him quiet for a little while. Eventually, when he's a little older, I may make cards that have shapes on them and see if he can "build" the shape. I have about 1 minute of my time invested in this one. :)
6. I saw these foam shapes in the Dollar bin at Target (what an evil thing to place at the entrance to the store!!). Again, he likes to put them in and out of the back (notice a trend yet?!) but I've taken these into doctor's offices with me and helped him stack them up while he sits on the exam tables waiting for the doctor. We also count them together, talk about the colors and I try to help him match. Things he's not doing on his own yet really, but it keeps him quiet for a few minutes and hopefully, if the novelty doesn't wear off, I can continue to use these as a teaching toy.

7. This is another that was a little more time consuming. I made this over the summer before we made a trip to Pittsburgh for doctor appointments. Megatron loves buckles. He doesn't have the finger strength to open or close them but he likes to try and then will ask for help. I took a plain canvas bag that I already had and sewed ribbons onto the side seams. I bought the buckles, including the metal clasp, at Joann's and sewed those onto the ribbons. I already had the wooden beads so I added those on one ribbon also. I reinforced all my stitches so they are pretty durable. I used the bag for a couple reasons, the first was that I already owned it. "Free!" Also, it was sturdy and a little stiff so it would flop around so much with the weight of the buckles and I knew I could hang it from the back of a chair or the stroller and he could stand up and play with it, especially when we were at the hospital in Pittsburgh visiting with his team. And of course there's the obvious, it's a bag. We threw a couple other toys into the bag so we could carry it easily into the hospital. I also added a Velcro strap so it could be rolled up and stuffed into the diaper bag if needed.


8. Here's another "free," it took me one minute and I made it out of stay-at-home mom desperation type of toys. I made this one quite awhile back. He seemed bored and I had no idea what to do with him. I took an empty "puffs" container (if you have a baby eating solids, you know what I'm talking about), pulled the label off and stuff a bunch of Popsicle sticks and straws (both from a dollar store, which I hoarded with my craft supplies) inside. At the time, Megatron was content to just shake the bottle to make noise. Then he figured out how to open it and likes to...can you guess?? Put them in and out of the container. Yay for fine motor skills! :) He stills likes to shake it too.


9. And another "free" toy. This one goes way back to last summer. This one is great for babies. I took a formula container, cleaned it, stripped the label off (and because I'm a nerd, decorated it with a Sharpie) and stuffed it full of scrap ribbons (I'm not selective when it comes to my craft hoarding). Endless baby fun. Lots of textures and back then, he would just pull them out of the box. We would put them back in, and he'd pull them back out. We also have another formula box that has dollar store dominoes in it. It makes horrible noise when you shake it, which he loves. Once we determined he wouldn't eat the dominoes, he would take them out and put them back in the box. Lately, he just likes to stand up and dump them out. I've also been showing him how to stack them like blocks.

10. This was an idea from another mom before we were about to make our road trip to Pittsburgh. A dollar store cookie sheet (which is the smallest, flimsiest cookie sheets I've ever seen and would never actually use in an oven) makes a great "desk" to hold stuff while he's strapped into his car seat. Once he's older, he can use it on his lap to color and draw. For now though, we use magnets! I bought these cute, pre-painted animal cut outs at Walmart along with a roll of magnetic tape. Two minutes later he had these cute, easy to hold (less likely to lose in the car) magnets he can use on the cookie sheet. I also bought a set of alphabet magnets from the dollar store. I only have A-B-C in the zippered pouch though because they are small enough to get lost in the car seats. I didn't want to be hunting for the entire alphabet after a road trip.

11. Also using the cookie sheet, I printed some road graphics which I found online, along with some traffic signs, onto card stock, cut them out and took them to a local office supply store to have them laminate them. I used the magnetic tape on the backs of the pieces. I put the pieces in a zippered pouch and he can create roadways and drive cars around on it. He's a little young to understand right now but he really liked playing with the traffic signs and putting those on the sheet. This toy worked great when we arrived in our hotel in Pittsburgh. It was quiet so it didn't disrupt the other guests and he was content.
So those are some of the things I've made so far. With the exception of the busy board, everything was less than $5 to make and required minimal time to put together. And none of it involves listening to obnoxious electronic toys or really makes me want to cringe at all. :) Happy mom = happy baby and happy baby = happy mom.


You're one crafty mama! I just might have to steal some of these ideas. "Hoarder's delight pile of craft crap"... sounds like me. Drives the husband nuts. haha
ReplyDelete